Thursday, 23 March 2017

Upgrade Firmware Lenovo A6000 Kraft A6000 S061 to Kraft A6000 S062

FavNetSoft.com - How to upgrade firmware Lenovo A6000 Lollipop Kraft A6000 S061 to Kraft A6000 S062. Good news for Lenovo A6000 users. Lenovo has been released new firmware update for Lenovo A6000 running android lollipop with build number Kraft-A6000 S062 161223. Now on this article, I will guide you how to install FOTA update Lenovo A6000 Kraft-A6000 S062 161223.

Upgrade Firmware Lenovo A6000 Kraft A6000 S061 to Kraft A6000 S062


Disclaimer

We won’t be held responsible for anything happening to your device during this process. We will help you during such situation. Please read follow each and every step as mentioned below.

Pre-Requisites Before Update Lenovo A6000 to Kraft-A6000 S062


How to Install FOTA Update Lenovo A6000 S061 to S062


  • Extract the FOTA file you have downloaded then copy System.zip and Country-code.ota.zip to the root folder on your sd card
  • Power off your device then go to recovery mode by pressing and hold the Volume Up, Volume Down, and Power button simultaneously. When you feel the device vibrate, immediately release the keys.
  • Select wipe data/factory reset and cache partition then press power button to confirm
  • Choose apply update from sdcard then select the System.zip file and enter by pressing power button
  • Wait until upgrade process finish
  • When the message comes complete then “Reboot to System”
  • Go to recovery mode then flash Country-code.ota.zip

Labels:

Tuesday, 21 March 2017

[ROM] Download Android O for Pixel XL [Marlin] Dev Preview

Download and install Android Dev Preview for Pixel XL.Android O but we’re really hoping it’ll become Android Oreo once it’s released).Introduces a number of new features and APIs to use in your apps. Here's are just a few new things for you to start trying in this first Developer Preview.
download- android-oreo
For the second year in a row, Google is making a developer preview for the next version of Android available in March, well ahead of its presumed consumer release in the fall. This one is codenamed “O,” and your guess is as good as mine as to what dessert the final version will be named after. It isn’t yet available for regular users to try out. Although developers can begin testing it right away, it’s best for most people to let things stabilize a bit more before they try it out. Developers can download it today.

Downloads


How to install Android O Dev Preview on Pixel XL:

  1. Download the Android O image for Pixel XL below, then unzip it to a safe directory.
  2. Connect your device to your computer over USB.
  3. Start the device in fastboot mode with one of the following methods:
    • Using the adb tool: With the device powered on, execute:
      adb reboot bootloader
    • Using a key combo: Turn the device off, then turn it on and immediately hold down the relevant key combination for your device. For example, to put a Nexus 5 ("hammerhead") into fastboot mode, press and hold Volume Up + Volume Down + Power as the device begins booting up.
  4. If necessary, unlock the device's bootloader using one of the following methods:
    • If you are updating a Pixel XL or Pixel XL device using the hammerhead or angler builds, update your fastboot tool to the latest available version (>=23.0.1), and then run this command:
      fastboot flashing unlock
    • If you are updating an older device, run this command:
      fastboot oem unlock

    The target device will show you a confirmation screen. (This erases all data on the target device.)
  5. Open a terminal and navigate to the unzipped Android O image for Pixel XL.
  6. Execute the flash-all script. This script installs the necessary bootloader, baseband firmware(s), and operating system.
Once the script finishes, your device reboots and Android O image for Pixel XL will installed. You should now lock the bootloader for security:

How to Lock bootloader 

  1. Start the device in fastboot mode again, as described above.
  2. Execute: 
    fastboot flashing lock
    or, for older devices, run
    fastboot oem lock
Locking bootloader will wipe the data on some devices. After locking the bootloader, if you want to flash the device again, you must run fastboot oem unlock again, which will wipe the data.

Labels: , , ,

[Download] How to Install Android O Pixel [sailfish] Dev Preview

Download and install Android Dev Preview for Pixel.Android O but we’re really hoping it’ll become Android Oreo once it’s released).Introduces a number of new features and APIs to use in your apps. Here's are just a few new things for you to start trying in this first Developer Preview.
download- android-oreo
For the second year in a row, Google is making a developer preview for the next version of Android available in March, well ahead of its presumed consumer release in the fall. This one is codenamed “O,” and your guess is as good as mine as to what dessert the final version will be named after. It isn’t yet available for regular users to try out. Although developers can begin testing it right away, it’s best for most people to let things stabilize a bit more before they try it out. Developers can download it today.

Downloads


How to install Android O Dev Preview on Pixel:

  1. Download the Android O image for Pixel below, then unzip it to a safe directory.
  2. Connect your device to your computer over USB.
  3. Start the device in fastboot mode with one of the following methods:
    • Using the adb tool: With the device powered on, execute:
      adb reboot bootloader
    • Using a key combo: Turn the device off, then turn it on and immediately hold down the relevant key combination for your device. For example, to put a Nexus 5 ("hammerhead") into fastboot mode, press and hold Volume Up + Volume Down + Power as the device begins booting up.
  4. If necessary, unlock the device's bootloader using one of the following methods:
    • If you are updating a Pixel or Pixel device using the hammerhead or angler builds, update your fastboot tool to the latest available version (>=23.0.1), and then run this command:
      fastboot flashing unlock
    • If you are updating an older device, run this command:
      fastboot oem unlock

    The target device will show you a confirmation screen. (This erases all data on the target device.)
  5. Open a terminal and navigate to the unzipped Android O image for Pixel.
  6. Execute the flash-all script. This script installs the necessary bootloader, baseband firmware(s), and operating system.
Once the script finishes, your device reboots and Android O image for Pixel will installed. You should now lock the bootloader for security:

How to Lock bootloader 

  1. Start the device in fastboot mode again, as described above.
  2. Execute: 
    fastboot flashing lock
    or, for older devices, run
    fastboot oem lock
Locking bootloader will wipe the data on some devices. After locking the bootloader, if you want to flash the device again, you must run fastboot oem unlock again, which will wipe the data.

Labels: , , ,

Download Android O for Nexus C [ryu] Dev Preview

Download and install Android Dev Preview for Pixel C.Android O but we’re really hoping it’ll become Android Oreo once it’s released).Introduces a number of new features and APIs to use in your apps. Here's are just a few new things for you to start trying in this first Developer Preview.
download- android-oreo
For the second year in a row, Google is making a developer preview for the next version of Android available in March, well ahead of its presumed consumer release in the fall. This one is codenamed “O,” and your guess is as good as mine as to what dessert the final version will be named after. It isn’t yet available for regular users to try out. Although developers can begin testing it right away, it’s best for most people to let things stabilize a bit more before they try it out. Developers can download it today.

Downloads


How to install Android O Dev Preview on Pixel C:

  1. Download the Android O image for Pixel C below, then unzip it to a safe directory.
  2. Connect your device to your computer over USB.
  3. Start the device in fastboot mode with one of the following methods:
    • Using the adb tool: With the device powered on, execute:
      adb reboot bootloader
    • Using a key combo: Turn the device off, then turn it on and immediately hold down the relevant key combination for your device. For example, to put a Nexus 5 ("hammerhead") into fastboot mode, press and hold Volume Up + Volume Down + Power as the device begins booting up.
  4. If necessary, unlock the device's bootloader using one of the following methods:
    • If you are updating a Pixel C or Pixel C device using the hammerhead or angler builds, update your fastboot tool to the latest available version (>=23.0.1), and then run this command:
      fastboot flashing unlock
    • If you are updating an older device, run this command:
      fastboot oem unlock

    The target device will show you a confirmation screen. (This erases all data on the target device.)
  5. Open a terminal and navigate to the unzipped Android O image for Pixel C.
  6. Execute the flash-all script. This script installs the necessary bootloader, baseband firmware(s), and operating system.
Once the script finishes, your device reboots and Android O image for Pixel C will installed. You should now lock the bootloader for security:

How to Lock bootloader 

  1. Start the device in fastboot mode again, as described above.
  2. Execute: 
    fastboot flashing lock
    or, for older devices, run
    fastboot oem lock
Locking bootloader will wipe the data on some devices. After locking the bootloader, if you want to flash the device again, you must run fastboot oem unlock again, which will wipe the data.

Labels: , , , ,

Download and install Android O Nexus 6P [angler] Dev Preview

Download and install Android O Dev Preview for Nexus 6P.Android O but we’re really hoping it’ll become Android Oreo once it’s released).Introduces a number of new features and APIs to use in your apps. Here's are just a few new things for you to start trying in this first Developer Preview.
download- android-oreo
For the second year in a row, Google is making a developer preview for the next version of Android available in March, well ahead of its presumed consumer release in the fall. This one is codenamed “O,” and your guess is as good as mine as to what dessert the final version will be named after. It isn’t yet available for regular users to try out. Although developers can begin testing it right away, it’s best for most people to let things stabilize a bit more before they try it out. Developers can download it today.

Downloads


How to install Android O Dev Preview on Nexus 6P:

  1. Download the Android O image for Nexus 6P below, then unzip it to a safe directory.
  2. Connect your device to your computer over USB.
  3. Start the device in fastboot mode with one of the following methods:
    • Using the adb tool: With the device powered on, execute:
      adb reboot bootloader
    • Using a key combo: Turn the device off, then turn it on and immediately hold down the relevant key combination for your device. For example, to put a Nexus 5 ("hammerhead") into fastboot mode, press and hold Volume Up + Volume Down + Power as the device begins booting up.
  4. If necessary, unlock the device's bootloader using one of the following methods:
    • If you are updating a Nexus 6P or Nexus 6P device using the hammerhead or angler builds, update your fastboot tool to the latest available version (>=23.0.1), and then run this command:
      fastboot flashing unlock
    • If you are updating an older device, run this command:
      fastboot oem unlock

    The target device will show you a confirmation screen. (This erases all data on the target device.)
  5. Open a terminal and navigate to the unzipped Android O image for Nexus 6P.
  6. Execute the flash-all script. This script installs the necessary bootloader, baseband firmware(s), and operating system.
Once the script finishes, your device reboots and Android O image for Nexus 6P will installed. You should now lock the bootloader for security:

How to Lock bootloader 

  1. Start the device in fastboot mode again, as described above.
  2. Execute: 
    fastboot flashing lock
    or, for older devices, run
    fastboot oem lock
Locking bootloader will wipe the data on some devices. After locking the bootloader, if you want to flash the device again, you must run fastboot oem unlock again, which will wipe the data.

Labels: , ,

How to install Android O on Nexus 5X [bullhead] Dev Preview

Download and install Android Dev Preview for Nexus 5X.Android O but we’re really hoping it’ll become Android Oreo once it’s released).Introduces a number of new features and APIs to use in your apps. Here's are just a few new things for you to start trying in this first Developer Preview.
download- android-oreo
For the second year in a row, Google is making a developer preview for the next version of Android available in March, well ahead of its presumed consumer release in the fall. This one is codenamed “O,” and your guess is as good as mine as to what dessert the final version will be named after. It isn’t yet available for regular users to try out. Although developers can begin testing it right away, it’s best for most people to let things stabilize a bit more before they try it out. Developers can download it today.

Downloads


How to install Android O Dev Preview on Nexus 5X:

  1. Download the Android O image for Nexus 5X below, then unzip it to a safe directory.
  2. Connect your device to your computer over USB.
  3. Start the device in fastboot mode with one of the following methods:
    • Using the adb tool: With the device powered on, execute:
      adb reboot bootloader
    • Using a key combo: Turn the device off, then turn it on and immediately hold down the relevant key combination for your device. For example, to put a Nexus 5 ("hammerhead") into fastboot mode, press and hold Volume Up + Volume Down + Power as the device begins booting up.
  4. If necessary, unlock the device's bootloader using one of the following methods:
    • If you are updating a Nexus 5X or Nexus 6P device using the hammerhead or angler builds, update your fastboot tool to the latest available version (>=23.0.1), and then run this command:
      fastboot flashing unlock
    • If you are updating an older device, run this command:
      fastboot oem unlock

    The target device will show you a confirmation screen. (This erases all data on the target device.)
  5. Open a terminal and navigate to the unzipped Android O image for Nexus 5X.
  6. Execute the flash-all script. This script installs the necessary bootloader, baseband firmware(s), and operating system.
Once the script finishes, your device reboots and Android O image for Nexus 5X will installed. You should now lock the bootloader for security:

How to Lock bootloader 

  1. Start the device in fastboot mode again, as described above.
  2. Execute: 
    fastboot flashing lock
    or, for older devices, run
    fastboot oem lock
Locking bootloader will wipe the data on some devices. After locking the bootloader, if you want to flash the device again, you must run fastboot oem unlock again, which will wipe the data.

Labels: , , , ,

Android O is Here : Download Android O Dev Preview for for Nexus...

The O Developer Preview includes an updated SDK with system images for testing on the official Android Emulator and on Nexus 5X, Nexus 6P, Nexus Player, Pixel, Pixel XL and Pixel C devices. If you're building for wearables, there's also an emulator for testing Android Wear 2.0 on Android O may be Oreo.O-MG, the Developer Preview of Android O is here.
Here is the latest Android version dev preview i.e Android O.


So, today, I'm excited to share a first developer preview of the next version of the OS: Android O. The usual caveats apply: it's early days, there are more features coming, and there's still plenty of stabilization and performance work ahead of us. But it's booting :).

Over the course of the next several months, we'll be releasing updated developer previews, and we'll be doing a deep dive on all things Android at Google I/O in May. In the meantime, we'd love your feedback on trying out new features, and of course testing your apps on the new OS.
What's new in O?

Android O introduces a number of new features and APIs to use in your apps. Here's are just a few new things for you to start trying in this first Developer Preview:

Background limits: Building on the work we began in Nougat, Android O puts a big priority on improving a user's battery life and the device's interactive performance. To make this possible, we've put additional automatic limits on what apps can do in the background, in three main areas: implicit broadcasts, background services, and location updates. These changes will make it easier to create apps that have minimal impact on a user's device and battery. Background limits represent a significant change in Android, so we want every developer to get familiar with them. Check out the documentation on background execution limits and background location limits for details.


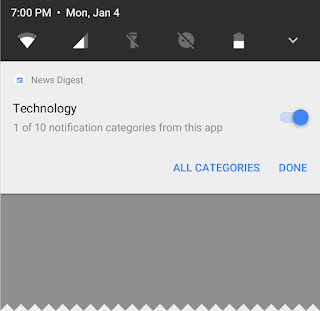
Notification channels: Android O also introduces notification channels, which are new app-defined categories for notification content. Channels let developers give users fine-grained control over different kinds of notifications — users can block or change the behavior of each channel individually, rather than managing all of the app's notifications together.


Notification channels let users control your app's notification categories

Android O also adds new visuals and grouping to notifications that make it easier for users to see what's going on when they have an incoming message or are glancing at the notification shade.


Autofill APIs: Android users already depend on a range of password managers to autofill login details and repetitive information, which makes setting up new apps or placing transactions easier. Now we are making this work more easily across the ecosystem by adding platform support for autofill. Users can select an autofill app, similar to the way they select a keyboard app. The autofill app stores and secures user data, such as addresses, user names, and even passwords. For apps that want to handle autofill, we're adding new APIs to implement an Autofill service.

PIP for handsets and new windowing features:

Picture in Picture (PIP) display is now available on phones and tablets, so users can continue watching a video while they're answering a chat or hailing a car. Apps can put themselves in PiP mode from the resumed or a pausing state where the system supports it - and you can specify the aspect ratio and a set of custom interactions (such as play/pause). Other new windowing features include a new app overlay window for apps to use instead of system alert window, and multi-display support for launching an activity on a remote display.

Font resources in XML: Fonts are now a fully supported resource type in Android O. Apps can now use fonts in XML layouts as well as define font families in XML — declaring the font style and weight along with the font files.

Adaptive icons: To help you integrate better with the device UI, you can now create adaptive icons that the system displays in different shapes, based on a mask selected by the device. The system also animates interactions with the icons, and them in the launcher, shortcuts, Settings, sharing dialogs, and in the overview screen.


Adaptive icons display in a variety of shapes across different device models.


Wide-gamut color for apps: Android developers of imaging apps can now take advantage of new devices that have a wide-gamut color capable display. To display wide gamut images, apps will need to enable a flag in their manifest (per activity) and load bitmaps with an embedded wide color profile (AdobeRGB, Pro Photo RGB, DCI-P3, etc.).

Connectivity: For the ultimate in audio fidelity, Android O now also supports high-quality Bluetooth audio codecs such as LDAC codec. We're also adding new Wi-Fi features as well, like Wi-Fi Aware, previously known as Neighbor Awareness Networking (NAN). On devices with the appropriate hardware, apps and nearby devices can discover and communicate over Wi-Fi without an Internet access point. We're working with our hardware partners to bring Wi-Fi Aware technology to devices as soon as possible.

The Telecom framework is extending ConnectionService APIs to enable third party calling apps integrate with System UI and operate seamlessly with other audio apps. For instance, apps can have their calls displayed and controlled in different kinds of UIs such as car head units.

Keyboard navigation: With the advent of Google Play apps on Chrome OS and other large form factors, we're seeing a resurgence of keyboard navigation use within these apps. In Android O we focused on building a more reliable, predictable model for "arrow" and "tab" navigation that aids both developers and end users.

AAudio API for Pro Audio: AAudio is a new native API that's designed specifically for apps that require high-performance, low-latency audio. Apps using AAudio read and write data via streams. In the Developer Preview we're releasing an early version of this new API to get your feedback.

WebView enhancements: In Android Nougat we introduced an optional multiprocess mode for WebView that moved the handling of web content into an isolated process. In Android O, we're enabling multiprocess mode by default and adding an API to let your app handle errors and crashes, for enhanced security and improved app stability. As a further security measure, you can now opt in your app's WebView objects to verify URLs through Google Safe Browsing.

Java 8 Language APIs and runtime optimizations: Android now supports several new Java Language APIs, including the new java.time API. In addition, the Android Runtime is faster than ever before, with improvements of up to 2x on some application benchmarks.

Partner platform contributions: Hardware manufacturers and silicon partners have accelerated fixes and enhancements to the Android platform in the O release. For example, Sony has contributed more than 30 feature enhancements, including the LDAC codec, and 250 bug fixes to Android O.

Labels: , , ,

Download FrancoKernel for Oneplus 2 Lineageos 14.1 Nougat 7.1.1

Here is a new kernel of Oneplus 2 for android nougat 7.1.1 based rom like lineageos rom.There are many features of this FrancoKernel.The dev of this kernel franciscofranco, share this kernel for oneplus 2 on xda forum you can also install the kernel easily on your device.

Features of this kernel:


1 - Legendary battery life

2 - Flash & forget

3 - Typical interfaces like display adjustments, sound control, vibration control, and all that boring stuff

4 - Bypasses the verified boot flag for Android Pay compatibility (root still breaks Android Pay but that's your own problem)

5 - Idle power consumption reduced to the absolute minimum (if you have wakelocks from 3rd party apps you're obviously on your own)

6 - Support for FKUpdater's Performance Profiles

7 - Magical support, I'm here every day, checking posts almost hourly, ready to help anytime (well, unless you fail to read the OP, which contains most info you need)

8 - Seemless integration with my app FKUpdater

9 - All cores are unlocked and unshackled from One Plus core control module. Mimicking the Nexus 6P all cores are online and hit idle states when they don't have tasks running, instead of going offline. Performance is greatly improved because all cores are readily available when needed

10 - Some famous wakelocks are blocked and disabled by default for maximum battery life through out the day
11 - No bull**** placebo patches, or "magical" optimizations

12 - Probably more, check my github for all the details - the code speaks for itself

Download


How to install FrancoKernel on Oneplus 2

1.Download  FrancoKernel.zip and place it in your device memory.
2.Then reboot your device into recovery mode.


3.Tap on “Install” in recovery mode and the select FrancoKernel.zip from your memory where you pasted it in 1st step.
4.Now After selecting the .zip file do “Swipe to confirm flash” at the bottom of the screen.
5.Once Flashed the FrancoKernel.zip files reboot your device. Done!

Labels: ,

LineageOS reaches over a million installations, adds more devices to its Pipeline

After end of Cyanogenmod, LineageOS pick from its ashes to create a new community and alternative Android OS. For the past several months, the team has been busy, releasing builds for an immense amount of devices. 


Now, it has been revealed that the team has hit a milestone with over one million installations.To be clear, the team did state that this doesn't necessarily mean that LineageOS has been installed on over a million devices, but that the OS itself has been installed over a million times.

In addition to the announcement, it was revealed that there would be some updates to the OS which are listed below.


Major changes since 6th March

  • Contacts can now be stored locally regardless of whether a contacts provider exists (contact-local-storage)
  • Custom QuickSettings tiles are back! (tiles) Initial tiles are as follows:
  • Caffeine
  • USB Tether
  • Sync
  • Battery saver
  • Ambient display
  • Heads Up
  • Volume Panel
  • ADB over Network
  • March security patches (r25) have been merged

Per usual, Many new builds are going to release this week.

Build roster

kltevzw has been merged into klte. To continue receiving updates, flash the latest klte build, as this is the last week of kltevzw builds.
Removed 14.1 devices
  • Maintainer is no longer active
    • Huawei Ascend Mate 2 - mt2
    • HTC One (GSM) - m7
    • HTC One (Verizon) - m7vzw

Added 14.1 devices
  • Samsung Galaxy S4 (Verizon) - jfltevzw - maintainer: invisiblek
  • Samsung Galaxy S4 (Intl) - jfltexx - maintainer: dimitris
  • LG G5 (Intl) - h850 - maintainer: rashed
  • LG V20 (T-Mobile) - h918 - maintainer: rashed
Added 13.0 devices
  • Motorola Droid 4 - maserati - maintainer: stargo
  • Motorola Droid RAZR (CDMA) - spyder - maintainer: stargo
  • Motorola Droid Bionic - targa - maintainer: stargo
  • Motorola Droid RAZR (GSM) - umts_spyder - maintainer: stargo
  • Motorola Photon Q - xt897 - maintainers: nadlabak, mccreary

Labels: , ,

Thursday, 16 March 2017

[Official] Download LineageOS 14.1 Galaxy S4 (INTL) (jfltexx) Nougat 7.1.1

Download Official Lineage OS For Samsung Galaxy S4 (INTL) (jfltexx) Nougat 7.1.1. Official Lineage os is based on the Android Open Source Project with extra contributions from many people within the Android community. It can be used without any need to have any Google application installed. Official LineageOS does still include various hardware-specific code, which is also slowly being open-sourced anyway.


DISCLAIMER:


THIS IS AN INITIAL BUILD WHICH MAY NOT BOOT AT ALL. HAVE A BACKUP BEFORE FLASHING THIS AND TRY AT YOUR OWN RISK.

Installing a custom ROM on a Samsung Galaxy S4 (INTL) (INTL) (jfltexx) requires the bootloader to be unlocked on the Samsung Galaxy S4 (INTL) (jfltexx) phone, which may VOID your warranty and may delete all your data. Before proceeding further you may consider backup all data on the phone. You are the only person doing changes to your phone and I cannot be held responsible for the mistakes done by you.

Status of Official Lineage os for Samsung Galaxy S4 (INTL) (jfltexx) Nougat 7.1 Custom ROM:

WHAT’S WORKING:
– Not Known
KNOWN ISSUES:
– Not Known


Before Starting

Take care of following tasks before you proceed with flashing custom ROM:
Task 1: Install USB drivers for your device on your PC.
Task 2: Be sure to backup your data including Contacts, SMS / MMS, APN & MMS Settings as well as photos and videos stored on your device’s internal or external storage.
Task 3: Make sure that your device is well charged. Ideally, the battery level should be around 60-80%. The more the better.
Task 4: USB Debugging should be enabled on your device.
Important: Most of the custom ROM will not have Google Apps in them. So, you will have to download and install GApps manually.Also take nandroid backup before installing

Done with preliminary precautionary steps? So, here’s the guide:

TWRP recovery let’s you do a number of cool stuff but the whole point of having a custom recovery is to be able to flash unsigned .zip files. These .zip files could be anything from a custom kernel, boot, recovery, MODs or full custom ROMs.


Let’s see how to flash a lineage os rom on Samsung Galaxy S4 (INTL) (jfltexx) using TWRP recovery.

How to Install a official Lineageos on Samsung Galaxy S4 (INTL) (jfltexx)


  1. Download and transfer the official Lineage os ROM and Gapps for linage os you wish to flash to your device’s storage.
  2. Boot your device into TWRP recovery.
  3. Select “Wipe” from TWRP main menu and do a “Swipe to Factory Reset” on the bottom of screen.
    └ Note: This will factory reset your device. If your custom ROM doesn’t require a factory reset, then simply skip this step.
  4. Go back to TWRP main menu, tap on “Install” and select the official Lineage os  ROM .zip file and gapps for lineage os that you transferred to your device in Step 1.
  5. After selecting the .zip file, do “Swipe to Confirm Flash” on the bottom of screen to begin the custom ROM installation process. This may take some time.
  6. Once your ROM is successfully flashed, you’ll see “Wipe cache/dalvik” option, select it and then do “Swipe to wipe” on bottom of screen.
  7. Once cache & dalvik wipe completes, hit the “Back” button on-screen and then select “Reboot System” button.

DOWNLOAD OFFICIAL LINEAGE OS FOR Samsung Galaxy S4 (INTL) (jfltexx)


1.Download Gapps for Official Lineage OS 7.1.1

2.Download Official Lineage os 14.1 for Samsung Galaxy S4 (INTL) (jfltexx)

3.How to Root official Lineage OS rom Easily

Labels: , ,

[Official] Download LineageOS 14.1 Galaxy S4 (VZW) (jfltevzw) Nougat 7.1.1

Download Official Lineage OS For Samsung Galaxy S4 (VZW) (jfltevzw) Nougat 7.1.1. Official Lineage os is based on the Android Open Source Project with extra contributions from many people within the Android community. It can be used without any need to have any Google application installed. Official LineageOS does still include various hardware-specific code, which is also slowly being open-sourced anyway.


DISCLAIMER:


THIS IS AN INITIAL BUILD WHICH MAY NOT BOOT AT ALL. HAVE A BACKUP BEFORE FLASHING THIS AND TRY AT YOUR OWN RISK.

Installing a custom ROM on a Samsung Galaxy S4 (VZW) (VZW) (jfltevzw) requires the bootloader to be unlocked on the Samsung Galaxy S4 (VZW) (jfltevzw) phone, which may VOID your warranty and may delete all your data. Before proceeding further you may consider backup all data on the phone. You are the only person doing changes to your phone and I cannot be held responsible for the mistakes done by you.

Status of Official Lineage os for Samsung Galaxy S4 (VZW) (jfltevzw) Nougat 7.1 Custom ROM:

WHAT’S WORKING:
– Not Known
KNOWN ISSUES:
– Not Known


Before Starting

Take care of following tasks before you proceed with flashing custom ROM:
Task 1: Install USB drivers for your device on your PC.
Task 2: Be sure to backup your data including Contacts, SMS / MMS, APN & MMS Settings as well as photos and videos stored on your device’s internal or external storage.
Task 3: Make sure that your device is well charged. Ideally, the battery level should be around 60-80%. The more the better.
Task 4: USB Debugging should be enabled on your device.
Important: Most of the custom ROM will not have Google Apps in them. So, you will have to download and install GApps manually.Also take nandroid backup before installing

Done with preliminary precautionary steps? So, here’s the guide:

TWRP recovery let’s you do a number of cool stuff but the whole point of having a custom recovery is to be able to flash unsigned .zip files. These .zip files could be anything from a custom kernel, boot, recovery, MODs or full custom ROMs.


Let’s see how to flash a lineage os rom on Samsung Galaxy S4 (VZW) (jfltevzw) using TWRP recovery.

How to Install a official Lineageos on Samsung Galaxy S4 (VZW) (jfltevzw)


  1. Download and transfer the official Lineage os ROM and Gapps for linage os you wish to flash to your device’s storage.
  2. Boot your device into TWRP recovery.
  3. Select “Wipe” from TWRP main menu and do a “Swipe to Factory Reset” on the bottom of screen.
    └ Note: This will factory reset your device. If your custom ROM doesn’t require a factory reset, then simply skip this step.
  4. Go back to TWRP main menu, tap on “Install” and select the official Lineage os  ROM .zip file and gapps for lineage os that you transferred to your device in Step 1.
  5. After selecting the .zip file, do “Swipe to Confirm Flash” on the bottom of screen to begin the custom ROM installation process. This may take some time.
  6. Once your ROM is successfully flashed, you’ll see “Wipe cache/dalvik” option, select it and then do “Swipe to wipe” on bottom of screen.
  7. Once cache & dalvik wipe completes, hit the “Back” button on-screen and then select “Reboot System” button.

DOWNLOAD OFFICIAL LINEAGE OS FOR Samsung Galaxy S4 (VZW) (jfltevzw)


1.Download Gapps for Official Lineage OS 7.1.1

2.Download Official Lineage os 14.1 for Samsung Galaxy S4 (VZW) (jfltevzw)

3.How to Root official Lineage OS rom Easily

Labels: , , ,