Sunday, 23 October 2016

Tutorial How to Flash Lenovo A6000 Stock ROM Kraft-A6000 S061 160727

Favnetsoft.Com - How to Flash Lenovo A6000 Stock ROM Kraft-A6000 S061 160727. The latest version of firmware for Lenovo A6000 has been released. You can get these updates through the system update. If the update process via FOTA fails, you can use the manual update method. Now, I will explain to you step by step how to update lenovo A6000 to Kraft-A6000 S061 160727.
Flash Lenovo A6000 Stock ROM Kraft-A6000 S061 160727


Pre-Requisites Before Update Lenovo A6000


  • Backup of your personal data
  • Make sure the battery capacity charged more than 40%
  • Download Lenovo A6000 Stock ROM Kraft-A6000 S061 160727 (Lollipop)

Disclaimer

We won’t be held responsible for anything happening to your device during this process. We will help you during such situation. Please read follow each and every step as mentioned below.

How to Install Lenovo A6000 Stock ROM Kraft-A6000 S061


  • Copy Kraft-A6000_S061_160727_WCB52C02E0.zip to SD card
  • Switch off your device then press and hold the Volume Down, Volume Up and Power Button simultaneously to boot into stock recovery mode


  • Select the wipe data/factory reset then press power key to confirm
  • Select wipe cache partition then press power to confirm
  • Select apply update from sd card then navigate to Kraft-A6000_S061_160727_WCB52C02E0.zip, press power button to confirm
  • Wait until process upgrade finish

Troubleshoot Failed Update


  • Extract Kraft-A6000_S061_160727_WCB52C02E0.zip on PC
  • Copy System.zip and CountryCode.ota.zip to SD card
  • Go to recovery mode
  • Install System.zip then CountryCode.ota.zip
  • Wait until process upgrade finish

Labels: ,

Saturday, 22 October 2016

Tutorial How To Flash TWRP 2.8.7.7 Lollipop (SevenMaxs) on Lenovo A6000/Plus/SE

Favnetsoft.Com - On the last article, I wrote an article about how to flash Lenovo A6000 TWRP 2.8.6.1 on Android Kitkat. Now I will share with you how do flash TWRP Recovery 2.8.7.7 by SevenMaxs on lenovo A6000/Plus/SE. So, TWRP version I use is 2.8.7.7 which have been developed by SevenMaxs, member of lenovo-forum.ru. Ok, do not waste any more time, let's do it.

TWRP 2.8.7.7 Lollipop (SevenMaxs)

Pre-Requisites Before Flash Lenovo A6000 TWRP 2.8.7.7 (Lollipop)

  • Your device running Android Lollipop (Important)
  • Backup of your personal data (contact, photos, videos, music, etc)
  • Make sure the battery capacity charged more than 40%
  • Download and install Lenovo A6000 USB driver
  • Download and install Minimal ADB and Fastboot Tool
  • Download Lenovo A6000 TWRP 2.8.7.7 by SevenMaxs (Lollipop)

Disclaimer

Rooting or installing a custom rom or recovery might brick your device or your  device may act abnormally and you also lose the device warranty. You may even get a dead SD card which might not work or you can leave your device in a dead state. Before going through the entire tutorial please be advised that it is your own responsibility to go further. We are not  liable for any loss of data or any property of yours by any mean.

How to Flash Lenovo A6000 TWRP 2.8.7.7 by SevenMaxs (Lollipop)

  1. Extract A6K2877SMLL502-droiddosh.com.zip
  2. Copy the recovery.img file to C:\Program Files (x86)\Minimal ADB and Fastboot or C:\Program Files\Minimal ADB and Fastboot directory
  3. Power off your device
  4. Go to bootloader mode by hold down Volume Down and Power Button together
  5. Connect your device to computer through USB cable
  6. Now go to the folder where the Minimal ADB And Fastboot program is installed (C:\Program Files (X86)\Minimal ADB And Fastboot)
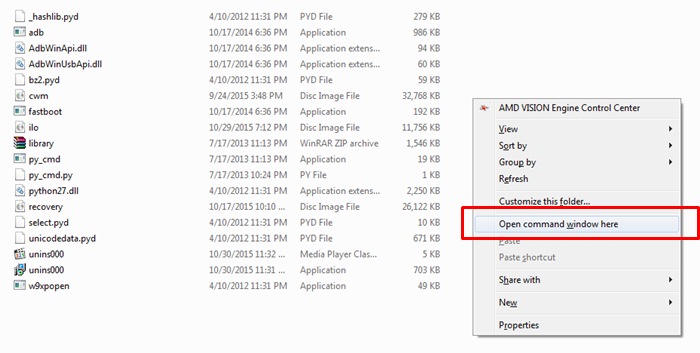
  7. Hold shift button and Right-Click on an empty space and select “Open Command Window Here” option, a command window will open up

  8. TWRP 2.8.7.7 Lollipop (SevenMaxs)
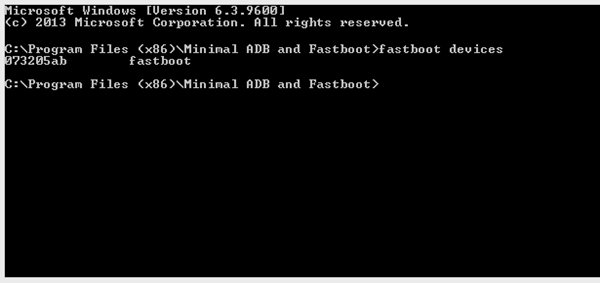
  9. Now, enter the following command to check whether your device is recognized by the computer

  10. fastboot devices

  11. If you see a device id, then your device is connected successfully.

  12. TWRP 2.8.7.7 Lollipop (SevenMaxs)

  13. Enter the following command to flash the Lenovo A6000 TWRP 2.8.7.7 by SevenMaxs

  14. fastboot flash recovery recovery.img

  15. Once the recovery image is flashed, enter the following command to reboot

  16. fastboot reboot

Now you have successfully finished flashing the Lenovo A6000 TWRP 2.8.7.7 by SevenMaxs (Lollipop). Once your device reboots, switch it off and press the Volume Down, Volume Up and Power Button simultaneously to boot into the TWRP recovery mode.

Labels: ,

Downgrade Lenovo A6000 to Kitkat From Lollipop Using Stock Recovery

Favnetsoft.Com - How to downgrade Lenovo A6000 from Lollipop to Kitkat easily. In my previous articles, I have written a tutorial how to downgrade Lenovo A6000 from Lollipop to Kitkat using TWRP Recovery. But, if you do not want to install TWRP Recovery on your device for any reason, you can still use the stock recovery to downgrade your Lenovo A6000.

Downgrade Lenovo A6000 to Kitkat From Lollipop Using Stock Recovery


Pre-Requisites Before Downgrade Lenovo A6000


  • Backup of your personal data
  • Your device running Android Lollipop (Important)
  • Make sure the battery capacity charged more than 40%
  • Lenovo A6000 Lollipop Stock Recovery is still installed on the device
  • Download Lenovo A6000 Stock ROM Kraft-A6000 S040 (Kitkat)

Disclaimer

We won’t be held responsible for anything happening to your device during this process. We will help you during such situation. Please read follow each and every step as mentioned below.

How to Downgrade Lenovo A6000 to Kitkat from Lollipop


  • Copy Lenovo A6000 Stock ROM Kraft-A6000 S040 to your SD card
  • Switch off your device then press and hold the Volume Down, Volume Up and Power Button simultaneously to boot into stock recovery mode


  • On recovery menu, choose apply update from sd card then select Lenovo A6000 Stock ROM Kraft-A6000 S040 and install
  • Wait until the upgrade process is completed then reboot to system
  • If the device is running normally, boot into recovery mode then select wipe data/factory reset and wipe cache partition

Labels: ,

Tutorial How To Flash Lenovo A6000 TWRP 2.8.6.1 Kitkat (SevenMaxs)

Favnetsoft.Com - This is a custom recovery favorite for Lenovo A6000. TWRP 2.8.6.1 by Sevenmaxs developed specifically for Lenovo A6000/Plus running Android Kitkat. If your device is running Android Lollipop, you can use TWRP 2.8.7.7 Lollipop. Now, how to flash Lenovo A6000 TWRP 2.8.6.1 by Sevenmax on Lenovo A6000/Plus?

Tutorial How To Flash Lenovo A6000 TWRP 2.8.6.1 Kitkat (SevenMaxs)

Pre-Requisites Before Flash Lenovo A6000 TWRP 2.8.6.1

  • Your device running Android Kitkat (Important)
  • Backup of your personal data
  • Make sure the battery capacity charged more than 40%
  • Download and install Lenovo A6000 USB driver
  • Download and install Minimal ADB and Fastboot Tool
  • Download Lenovo A6000 TWRP 2.8.6.1 Kitkat by SevenMaxs

Disclaimer

Rooting or installing a custom rom or recovery might brick your device or your  device may act abnormally and you also lose the device warranty. You may even get a dead SD card which might not work or you can leave your device in a dead state. Before going through the entire tutorial please be advised that it is your own responsibility to go further. We are not  liable for any loss of data or any property of yours by any mean.

Step by Step Flash Lenovo A6000 TWRP 2.8.6.1 Kitkat

  1. Extract A6K2861SMKK444-droiddosh.com.zip
  2. Copy the recovery.img file to C:\Program Files (x86)\Minimal ADB and Fastboot or C:\Program Files\Minimal ADB and Fastboot directory
  3. Power off your device
  4. Go to bootloader mode by hold down Volume Down and Power Button together
  5. Connect your device to computer through USB cable
  6. Now go to the folder where the Minimal ADB And Fastboot program is installed (C:\Program Files (X86)\Minimal ADB And Fastboot)
  7. Hold shift button and Right-Click on an empty space and select “Open Command Window Here” option, a command window will open up

  8. Tutorial How To Flash Lenovo A6000 TWRP 2.8.6.1 Kitkat (SevenMaxs)
  9. Now, enter the following command to check whether your device is recognized by the computer

  10. fastboot devices

  11. If you see a device id, then your device is connected successfully.

  12. Tutorial How To Flash Lenovo A6000 TWRP 2.8.6.1 Kitkat (SevenMaxs)

  13. Enter the following command to flash the Lenovo A6000 TWRP 2.8.6.1 by SevenMaxs

  14. fastboot flash recovery recovery.img

  15. Once the recovery image is flashed, enter the following command to reboot

  16. fastboot reboot

Now you have successfully finished flashing the Lenovo A6000 TWRP 2.8.6.1 Kitkat. Once your device reboots, switch it off and press the Volume Down, Volume Up and Power Button simultaneously to boot into the TWRP recovery mode.

Labels: ,

Saturday, 12 September 2015

Tutorial How to Root Lenovo A6000/Plus/SE (Lollipop 5.0.2)

Favnetsoft.Com - Rooting your device allow you to access the entire operating system and customize just about anything on your Android. With root access, you can also get around any restrictions that your manufacturer or carrier may have applied.


Tutorial How to Root Lenovo A6000/Plus/SE (Lollipop 5.0.2)

One of the most obvious incentives to root your Android device is to rid yourself of the bloatware that’s impossible to uninstall. Additional benefits include the ability to install special apps and flash custom ROMs, each of which can add extra features and streamline your phone performance. And on this article I will guide you, how to root Lenovo A6000 which running on Android Lollipop 5.0.2.

Pre-Requisites Before Root Lenovo A6000 Lollipop 5.0.2

  • Your device running Android Lollipop 5.0.2
  • Backup of your personal data
  • Make sure the battery capacity charged more than 60%
  • Enable USB Debugging Mode on your device, read the tutorial here
  • Go to Settings » Security and enable Unknown Sources option
  • Download and install Lenovo A6000 USB driver
  • Download and flash Lenovo A6000 TWRP Recovery 2.8.7.7 Lollipop by SevenMaxs
  • Download SuperSU v2.46 for Lenovo A6000/A6000 Plus/A6000 SE

Disclaimer

Rooting or installing a custom rom or recovery might brick your device or your  device may act abnormally and you also lose the device warranty. You may even get a dead SD card which might not work or you can leave your device in a dead state. Before going through the entire tutorial please be advised that it is your own responsibility to go further. We are not  liable for any loss of data or any property of yours by any mean.

How to Root Lenovo A6000 Running Android Lollipop 5.0.2

  1. Copy SuperSU-v2.46-favnetsoft.com.zip from PC to SD card through USB cable
  2. Switch off your device then press and hold the Volume Down, Volume Up and Power Button simultaneously to boot into TWRP recovery mode
  3. On TWRP recovery menu, go to Install
  4. Select Install zip and navigate to SuperSU-v2.46-favnetsoft.com.zip.
  5. Swipe to confirm Installation of zip.
  6. Congratulation! You have successfully rooted your Lenovo A6000, A6000 Plus, or A6000 SE

Labels: ,

Tutorial Upgrade Lenovo A6000 from Kitkat to Lollipop

Favnetsoft.Com - Lenovo A6000 Lollipop 5.0.2 update is finally over and now you can upgrade from your old version which is running on Kitkat 4.4.4. On this article, I will guide you how to upgrade your Lenovo A6000 from Kitkat to Lollipop. The operation may erase your personal data so please make sure you back up your personal data before performing upgrade.

Tutorial Upgrade Lenovo A6000 from Kitkat to Lollipop

Pre-Requisites to Upgrade Lenovo A6000 from Kitkat to Lollipop

  1. Backup of your personal data
  2. Make sure the battery capacity of more than 50 %
  3. Device not rooted
  4. Download Official Stock ROM Lenovo A6000 - Lollipop here

Disclaimer

We won’t be held responsible for anything happening to your device during this process. We will help you during such situation. Please read follow each and every step as mentioned below.


Step by Step How to Upgrade Lenovo A6000 from Kitkat to Lollipop

  1. Copy stock ROM Lenovo A6000 - Lollipop on your SD card
  2. Go to the Recovery Mode by pressing the volume up and volume down then press power button
  3. Make a full system wipe of data partition and cache partition
  4. Choose apply update from sdcard then select the Stock ROM zip file and enter by pressing power button
  5. When the message comes complete then “Reboot to System” (the first boot can take up to 5 minutes)

Labels: ,

Saturday, 5 September 2015

Tutorial Downgrade Lenovo A6000 from Lollipop to Kitkat

Favnetsoft.Com - Simple tutorial how to revert back to Kitkat from Lollipop just by installing a TWRP Recovery on Lenovo A6000 which is running on Lollipop and then flash the Stock Rom Kitkat for Lenovo A6000.

Downgrade Lenovo A6000 from Lollipop to Kitkat

Pre-Requisites to Downgrade Lenovo A6000 from Lollipop to Kitkat


  • Backup of your personal data
  • Make sure the battery capacity of more than 50 %
  • Install TWRP Recovery on Lenovo A6000 which is running on Lollipop, read the tutorial here
    Note: if you want to downgrade using stock recovery, you can read the article here
  • Download Official Stock ROM Lenovo A6000 - Kitkat here

Disclaimer

We won’t be held responsible for anything happening to your device during this process. We will help you during such situation. Please read follow each and every step as mentioned below.

Step by Step How to Downgrade Lenovo A6000 from Lollipop to Kitkat


  • Copy stock ROM Lenovo A6000 - Kitkat on your SD card
  • Boot into TWRP Recovery mode by hold down Vol Up, Vol Down, and Power button together.
  • Make a full system wipe of dalvik cache, data, cache etc using the “Format button
  • Go back the main screen and select “Install” and then press one level up and select the SD Card.
  • Now select the Stock ROM zip file and “Swipe Install”
  • When the message comes complete then “Reboot to System”

Labels: ,

Tutorial Install TWRP Recovery On Lenovo A6000/A6000 Plus Lollipop

Favnetsoft.Com - TWRP (Team Win Recovery Project) recovery will help you flash custom roms, or stock roms. You can even revert back to Kitkat on Lenovo A6000/Plus and also you can take backups and restore it later if you brick your device while installing custom roms.

Tutorial Install TWRP Recovery On Lenovo A6000/A6000 Plus Lollipop

Pre-Requisites To Install TWRP Recovery

  1. Backup of your personal data
  2. Make sure the battery capacity of more than 50 %
  3. Enable USB Debugging Mode on your device, read the tutorial here
  4. Go to Settings > Security and enable Unknown Sources option
  5. Connect your Lenovo A6000 to your PC and install the application (CDROM) which you can see in your My Computer or This PC
  6. Setup ADB and Fastboot drivers on your PC, read the tutorial here
  7. Download the following  TWRP recovery.img from here
Also read:
  1. Tutorial How To Flash TWRP 2.8.7.7 Lollipop (SevenMaxs) on Lenovo A6000/Plus/SE
  2. Tutorial How To Flash Lenovo A6000 TWRP 2.8.6.1 Kitkat (SevenMaxs)

Disclaimer

Rooting or installing a custom rom or recovery might brick your device or your  device may act abnormally and you also lose the device warranty. You may even get a dead SD card which might not work or you can leave your device in a dead state. Before going through the entire tutorial please be advised that it is your own responsibility to go further. We are not  liable for any loss of data or any property of yours by any mean.

Step by Step Install TWRP Recovery On Lenovo A6000 Lollipop

  1. Extract lenovo-a6000-twrp-favnetsoft.com
  2. Copy the recovery.img file to C:\Program Files (x86)\Minimal ADB and Fastboot or C:\Program Files\Minimal ADB and Fastboot directory


  3. Open C:\Program Files (x86)\Minimal ADB and Fastboot or C:\Program Files\Minimal ADB and Fastboot directory and right click on py_cmd.exe file and Run as Administrator


  4. In the command box type  the following:
  5. adb devices
  6. You will get this message:


  7. Now type in the command box
    adb reboot bootloader
  8. This will reboot your device into Bootloader / Fastboot Mode.
  9. Now type again in the command box
    fastboot boot recovery.img

  10. Once you get the finished message in the command box then type the following command to reboot Lenovo A6000.
    fastboot reboot
TWRP Recovery now been installed in your Lenovo A6000 Lollipop. Good luck.

Labels: , ,

How To Enable USB Debugging on Android Smartphone

Favnetsoft.Com - The ways to enable USB Debugging mode vary from one Android version to another. USB Debugging is required by Minimal ADB and Fastboot, which is used for rooting, backing up, installing a custom ROM and more.

How To Enable USB Debugging on Android Smartphone

1. Android 2.0-2.3.x

Settings > Applications > Development > USB Debugging

2. Android 3.0- 4.1.x

Settings > Developer Options > USB Debugging

3. Android 4.2.x and higher.

In Android 4.2 and higher versions, the Developer Options menu and USB Debugging option have been hidden. In former 4.X versions of Android, USB Debugging option is under Developer Options menu.

1. Enable "Developer Options Menu".
  • Click Menu button to enter into App drawer.
  • Go to "Settings".
  • Scroll down to the bottom and tap "About phone" or "About tablet",
  • Scroll down to the bottom of the "About phone" and locate the "Build Number" field.
  • Tap the Build number field seven times to enable Developer Options. Tap a few times and you'll see a countdown that reads "You are now 3 steps away from being a developer."
  • When you are done, you'll see the message "You are now a developer!".
  • Tap the Back button and you'll see the Developer options menu under System on your Settings screen.
2. Enable USB Debugging mode.
Go to Settings>Developer Options>USB Debugging. Tap the USB Debugging checkbox.

Labels:

Friday, 4 September 2015

Tutorial Install Minimal ADB and Fastboot on Windows

Favnetsoft.Com - Here is a tutorial for installing Minimal ADB and Fastboot for installing or flashing recovery or custom roms from your PC or Laptop.

Tutorial Install Minimal ADB and Fastboot

Tutorial Install Minimal ADB and Fastboot

  1. Disable your anti virus program
  2. Download file Minimal ADB and Fastboot from here and then extract it
  3. Double click file minimal_adb_fastboot_v1.2_setup.exe
  4. Follow the screen and install it
  5. Do not launch it from the installation window and then click finish

Check Function

Windows 64bit:
Go to C:Program Files (x86)Minimal ADB and Fastboot and right click on py_cmd.exe and Run as administrator


Windows 32bit:
Go to C:Program FilesMinimal ADB and Fastboot and right click on py_cmd.exe and Run as administrator

Screenshot


Labels: